> ## Documentation Index
> Fetch the complete documentation index at: https://docs.tryassist.in/llms.txt
> Use this file to discover all available pages before exploring further.
# Gmail OAuth
This guide walks you through connecting Gmail using an OAuth-enabled Google App. No paid Google Workspace account is required anyone can follow these steps!
## Authorization
1. **Create a Google Cloud Project** Visit [https://console.cloud.google.com/projectcreate](https://console.cloud.google.com/projectcreate) and create a new project.
2. **Enable Gmail API**
* On the left panel, open **APIs & services**
* Go to **Enabled APIs and services**
* On the top click **+ENABLE APIS AND SERVICES**
* Search for **Gmail API** and click **ENABLE**
* Alternatively visit this [**link**](https://console.cloud.google.com/apis/enableflow?apiid=gmail.googleapis.com), select your project and enable the **Gmail API**
3. **Configure the OAuth Consent Screen** Under APIs & Services, open the OAuth consent screen tab. If you don't have a Google Organization, select `External` as the User Type. Name the app **Assist AI** (or any name you prefer). Provide the required support emails — you can use your own or `info@tryassist.in`. Click **Save and Continue**.
4. **Configure Scopes** Add the `.../auth/gmail.readonly` scope for the Gmail API.
 To enable permission syncing for this connector:
* Enable the **Admin SDK API** (visit this link: [**https://console.cloud.google.com/flows/enableapi?apiid=admin.googleapis.com**](https://console.cloud.google.com/flows/enableapi?apiid=admin.googleapis.com)) and enable it for your project.
* Add the scope `.../auth/admins.directory.user.readonly` for `Admin SDK API`.
* Add the scope `.../auth/admins.directory.group.readonly` for `Admin SDK API`.
* The account performing the OAuth flow must have an Admin role in the Google Workspace that has access to the “Groups > Read” privilege. This can be set in the Google Admin Console under Account > Admin roles.
5. **Add Test Users** Add at least one test user email *(only if you don't have a Google Organization)* only these accounts will be permitted to run the OAuth flow and index emails. Click **Save and Continue**, review your settings, then return to the dashboard.
6. **Create OAuth Credentials**
* Go to the **Credentials** tab and select **+ Create Credentials → OAuth Client ID**.
To enable permission syncing for this connector:
* Enable the **Admin SDK API** (visit this link: [**https://console.cloud.google.com/flows/enableapi?apiid=admin.googleapis.com**](https://console.cloud.google.com/flows/enableapi?apiid=admin.googleapis.com)) and enable it for your project.
* Add the scope `.../auth/admins.directory.user.readonly` for `Admin SDK API`.
* Add the scope `.../auth/admins.directory.group.readonly` for `Admin SDK API`.
* The account performing the OAuth flow must have an Admin role in the Google Workspace that has access to the “Groups > Read” privilege. This can be set in the Google Admin Console under Account > Admin roles.
5. **Add Test Users** Add at least one test user email *(only if you don't have a Google Organization)* only these accounts will be permitted to run the OAuth flow and index emails. Click **Save and Continue**, review your settings, then return to the dashboard.
6. **Create OAuth Credentials**
* Go to the **Credentials** tab and select **+ Create Credentials → OAuth Client ID**.
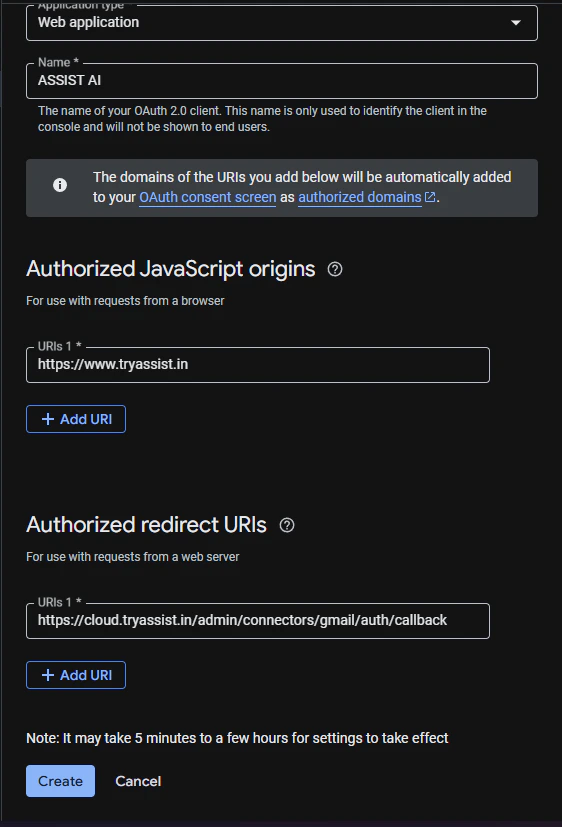
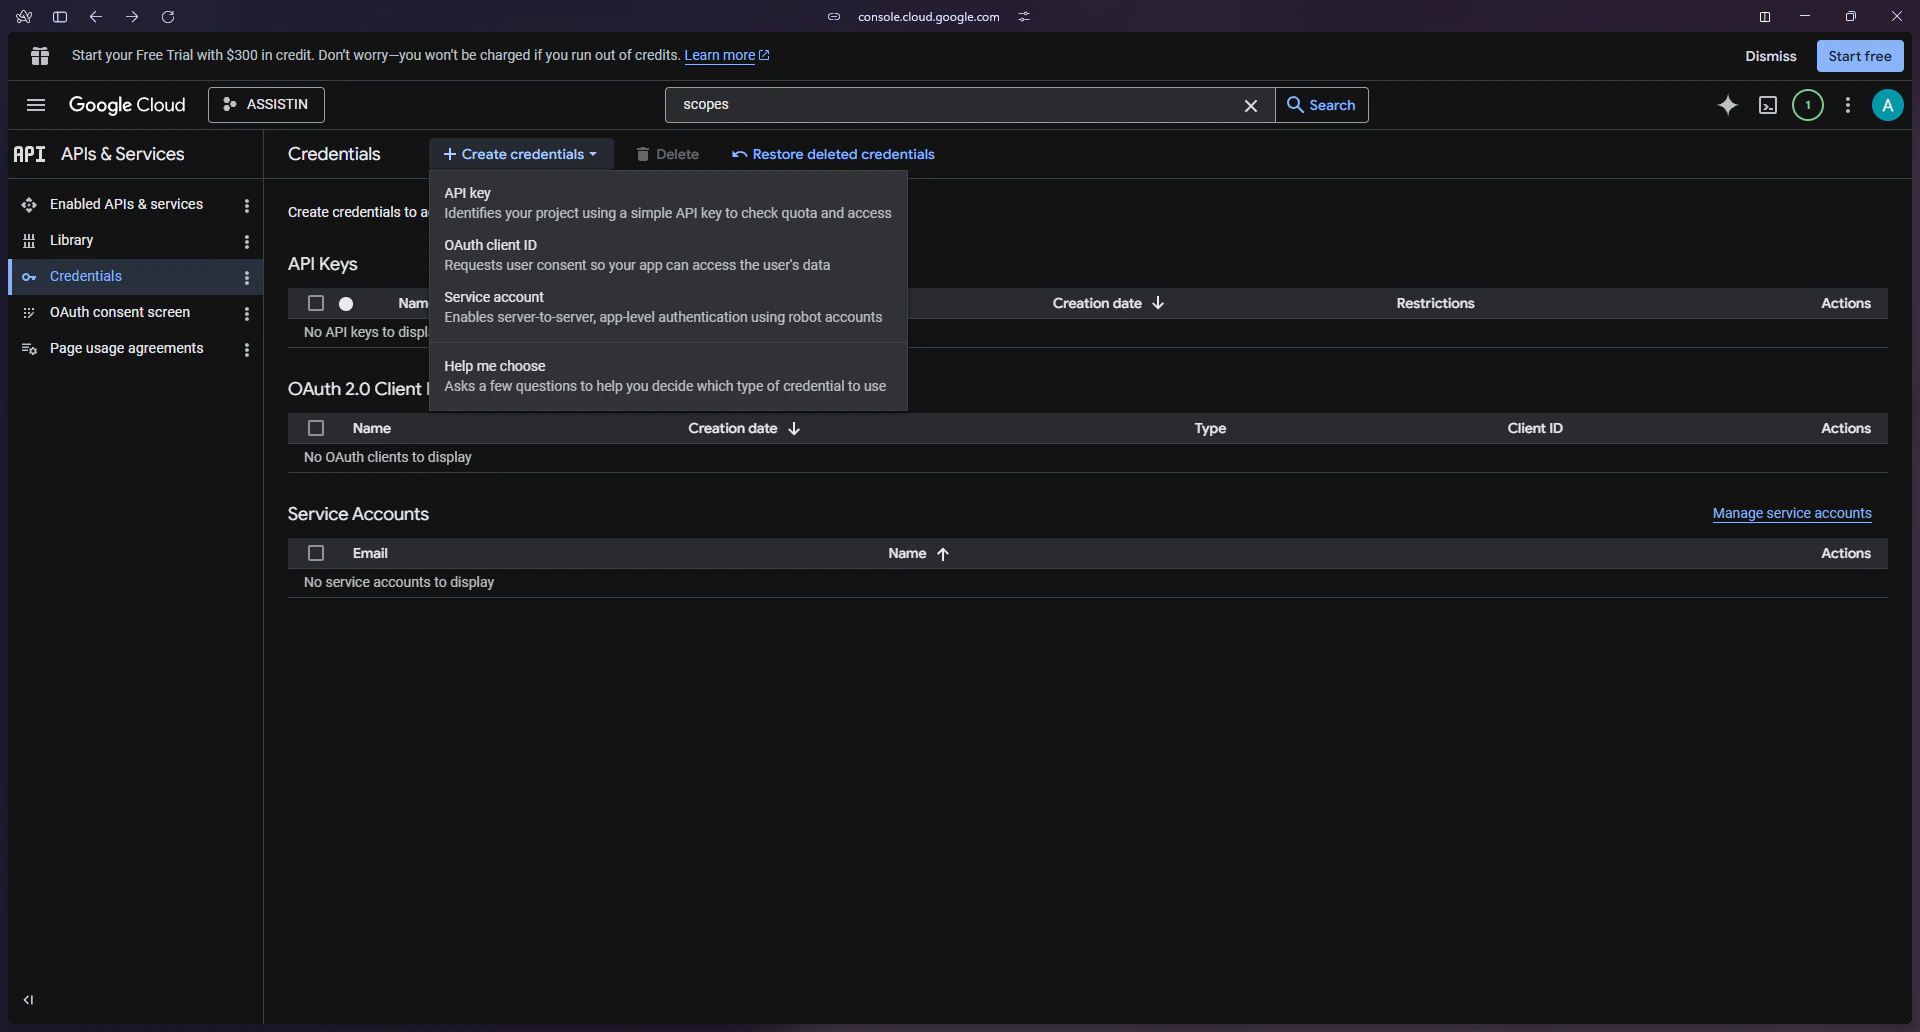 * Choose **Web Application** and give it a name like `AssistAIConnector`. Then configure the following:
* **Authorized JavaScript Origins:**
* `https://cloud.tryassist` (Assist AI Cloud)
* **Authorized Redirect URIs:**
* `https://cloud.tryassist.in/admin/connectors/gmail/auth/callback` (Assist AI Cloud)
* Choose **Web Application** and give it a name like `AssistAIConnector`. Then configure the following:
* **Authorized JavaScript Origins:**
* `https://cloud.tryassist` (Assist AI Cloud)
* **Authorized Redirect URIs:**
* `https://cloud.tryassist.in/admin/connectors/gmail/auth/callback` (Assist AI Cloud)
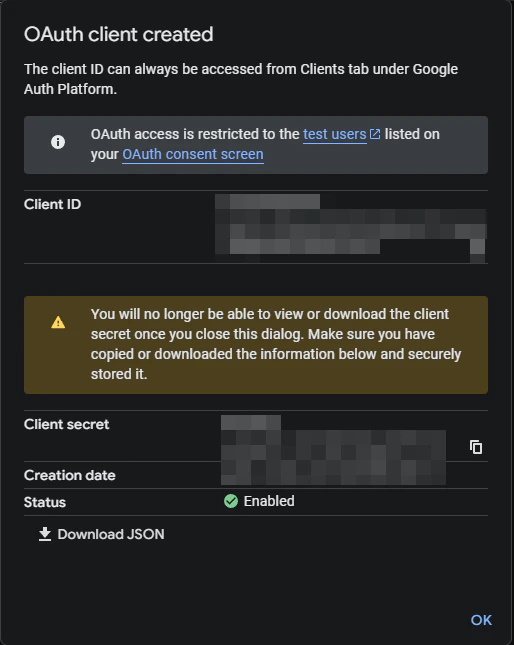 Click **Create**, then download the credentials JSON file from the Client Secret panel — you'll need it in the next step.