> ## Documentation Index
> Fetch the complete documentation index at: https://docs.tryassist.in/llms.txt
> Use this file to discover all available pages before exploring further.
# Anthropic's Claude
## Guide
1. **Navigate to AI Model Configuration Page** Access the Admin Panel from your user profile icon → **Admin Panel** → **LLM**
2. **Configure Anthropic**
* Select **Anthropic** from the available providers.Give this configuration a **Display Name**.
* Create an [**API key**](https://console.anthropic.com/dashboard) from the Anthropic API dashboard and paste it in the **API Key** field.
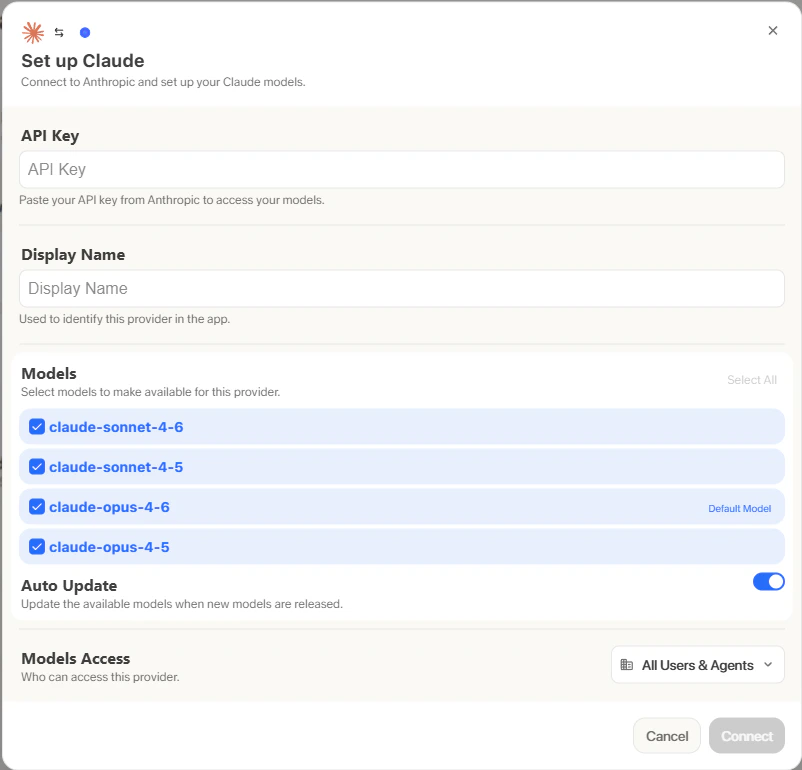 3. **Configure Default and Fast Models** The **Default Model** is automatically selected for new custom Agents and Chat sessions. Designating a **Fast Model** is optional — this model is used behind the scenes for quick operations such as evaluating message types, generating query variations (query expansion), and naming chat sessions. If you choose a Fast Model, ensure it is a relatively quick and cost-effective option such as `GPT-4.1-mini` or `Claude 3.7 Sonnet`.
4. **Choose Visible Models** Under **Advanced Options**, you will find a full list of models available from this provider. You can select which models are visible to your users within ASSIST AI. This is particularly useful when a provider offers multiple models and versions of the same model.
5. **Designate Provider Access** Finally, you can choose whether the provider is publicly accessible to all users in ASSIST AI. If set to private, the provider's models will only be available to Admins and the User you explicitly assign the provider to.
3. **Configure Default and Fast Models** The **Default Model** is automatically selected for new custom Agents and Chat sessions. Designating a **Fast Model** is optional — this model is used behind the scenes for quick operations such as evaluating message types, generating query variations (query expansion), and naming chat sessions. If you choose a Fast Model, ensure it is a relatively quick and cost-effective option such as `GPT-4.1-mini` or `Claude 3.7 Sonnet`.
4. **Choose Visible Models** Under **Advanced Options**, you will find a full list of models available from this provider. You can select which models are visible to your users within ASSIST AI. This is particularly useful when a provider offers multiple models and versions of the same model.
5. **Designate Provider Access** Finally, you can choose whether the provider is publicly accessible to all users in ASSIST AI. If set to private, the provider's models will only be available to Admins and the User you explicitly assign the provider to.